
Communication Channels
Enabling external communication channels used to interact with your customers
The communication channels are a cornerstone of Wapping as it's the means to allow your customer to interact with the business, and for them to receive all the segmented and therefore relevant information.
Below there will be information on how to enable each channel, as it oftens require some steps prior to connecting with Wapping.
SMS
Only a sender alpha string of 11 characters at maximum will be required.
Once provided Wapping will handle it and provision it with our service providers.
Depending on the supported countries an additional registration process may be needed.
In general, Wapping will handle this transparently, but in some instances business interaction is needed.
Below are listed some of the most prominent examples:
Spain (CNMC) → brand ownership proof, legal representative, alias registration.
India (DLT) → brand/entity registration and template approval.
Australia → sender ID and content whitelisting.
Various Middle East and Asian markets (e.g. Qatar, UAE, Malaysia, Pakistan, Nigeria depending on operator)
During the onboarding you will be guided through this process depending on the target countries.
Email
For managing email communications, we need a domain from which the emails will be sent and a mailbox name.
We recommend creating a specific subdomain for email so that club communications are clearly differentiated from corporate ones. This can be done at the DNS level on the current domain, e.g., [email protected].
Once this is decided, we will set it up and provide you with DNS records to configure in your domain manager.
With this, the email channel configuration will be complete.
Push
For the push notifications to be used, with either an already existing app, or the app provided by Wapping, both an Apple and Google developer accounts must be created and given access to the Wapping team.
Ideally the business already have this preexisting, if that's not the case, you can follow the guide here
iOS Setup
To receive push notifications on iOS, Wapping requires the APNS private key. This involves:
- Creating Apple Push Notification service SSL certificates (Sandbox & Production) for the corresponding App ID via the Apple Developer Portal.
- Downloading the certificates on a Mac device and adding them to the Keychain.
- Exporting both the certificate and the private key to a .p12 file.
- Sending the .p12 file to Wapping along with the password used to protect it.
This file will be used to authenticate with Apple’s API.
If Wapping has access to the business’s Apple Developer account, the onboarding team can perform this setup directly.
Android Setup
Part 1: google-services.json
- Create a Firebase project at https://console.firebase.google.com.
- Register your Android app using the same package name as in the Play Store.
- Download the google-services.json file.
- Send the file to Wapping so it can be included in future app versions.
Part 2: Private Key
- In the Firebase Console, select your project.
- Click the gear icon in the left sidebar and go to Project Settings.
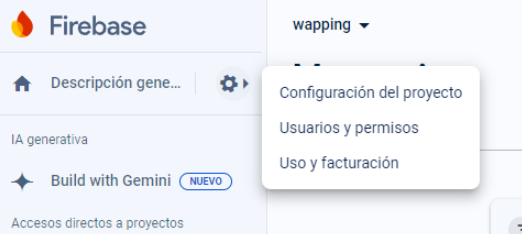
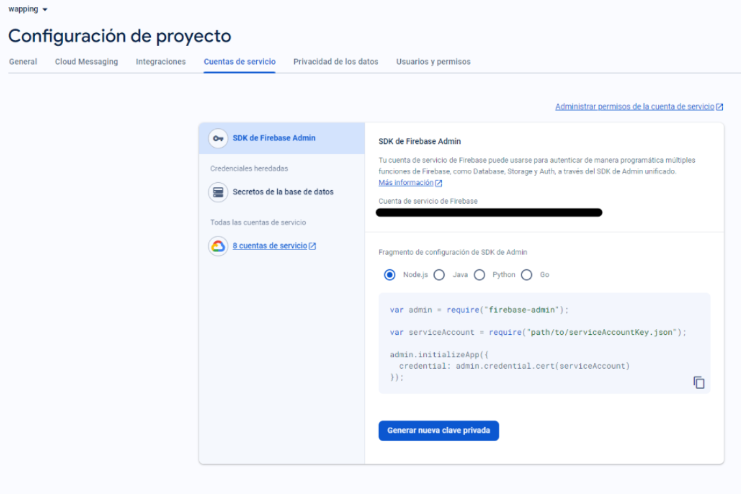
- Navigate to the Service Accounts tab.
- Click Generate new private key.
This will download a JSON file similar to the following:
{
  "type": "type_account",
  "project_id": "my-project-id",
  "private_key_id": "private-key-id",
  "private_key": "-----BEGIN PRIVATE KEY-----\nPrivate key content\n-----END PRIVATE KEY-----\n",
  "client_email": "[email protected]",
  "client_id": "client_id",
  "auth_uri": "https://accounts.google.com/o/oauth2/auth",
  "token_uri": "https://oauth2.googleapis.com/token",
  "auth_provider_x509_cert_url": "https://www.googleapis.com/oauth2/v1/certs",
  "client_x509_cert_url": "https://www.googleapis.com/robot/v1/metadata/x509/[email protected]",
  "universe_domain": "example.com"
}
This file should be sent to Wapping, where it will be securely stored in Base64 format in a KeyVault.
External Apps (Business-Owned) – Token Management
This is only needed when the app is preexisting and not provided by Wapping, and there is need to connect it with the Wapping Customer Wallet, and to be able to send push notifications from the platform.
To send push notifications, installation tokens must be registered for both Android and iOS devices.
To achieve that a small integration with the WebApp Api (https://webapp-api.b2w.app/) must be done, following the steps:
Step 1: Authentication
Send an AuthRequest object to the Auth method:
{
  "apiKey": "API key provided by Wapping",
  "appPackageName": "com.MyApp.app"
}
Step 2: Token Registration
Send an InstallationTokenRequest object to the saveToken method:
{
  "deviceToken": "string", //Firebase or Apple installation ID of the device
  "previousDeviceToken": "string", //Previous installation ID, used when updating expired tokens.
  "expirationDate": "2024-07-09T10:15:24.885Z", //Token expiration date in UTC format.
  "notificationToken": "string", //Token used to send notifications via Firebase or Apple.
  "platform": "string", //"fcm" for Android, "apns" for iOS.
  "customerId": 0, //Unique Wapping customer ID for the user.
	"systemId": 1, //System identifier
	"customSystemCode": "string", //Custom system identifier
	"identifier": "string" //Customer identifier
}
The identification of the customer has to be either wapping customerId or systemId + identifier + customSystemCode if applies.
This process ensures proper management and updating of notification tokens, enabling push notifications to be sent to registered devices.
Whatsapp
The whatsapp channel is needed to both send notifications as to provision the communication bot to assist with customer enrolment in the brand.
Prepare Requirements
Dedicated phone number (not linked to personal WhatsApp).
Business details: name, address, website, logo.
Meta Business Suite account.
Create Meta Business Account
Go to Meta Business Suite.
Sign in or create a new account.
Add business information and verify email.
Complete Meta Verification
Provide required documents if requested.
Wait for approval.
Link Whatsapp in Wapping Manager
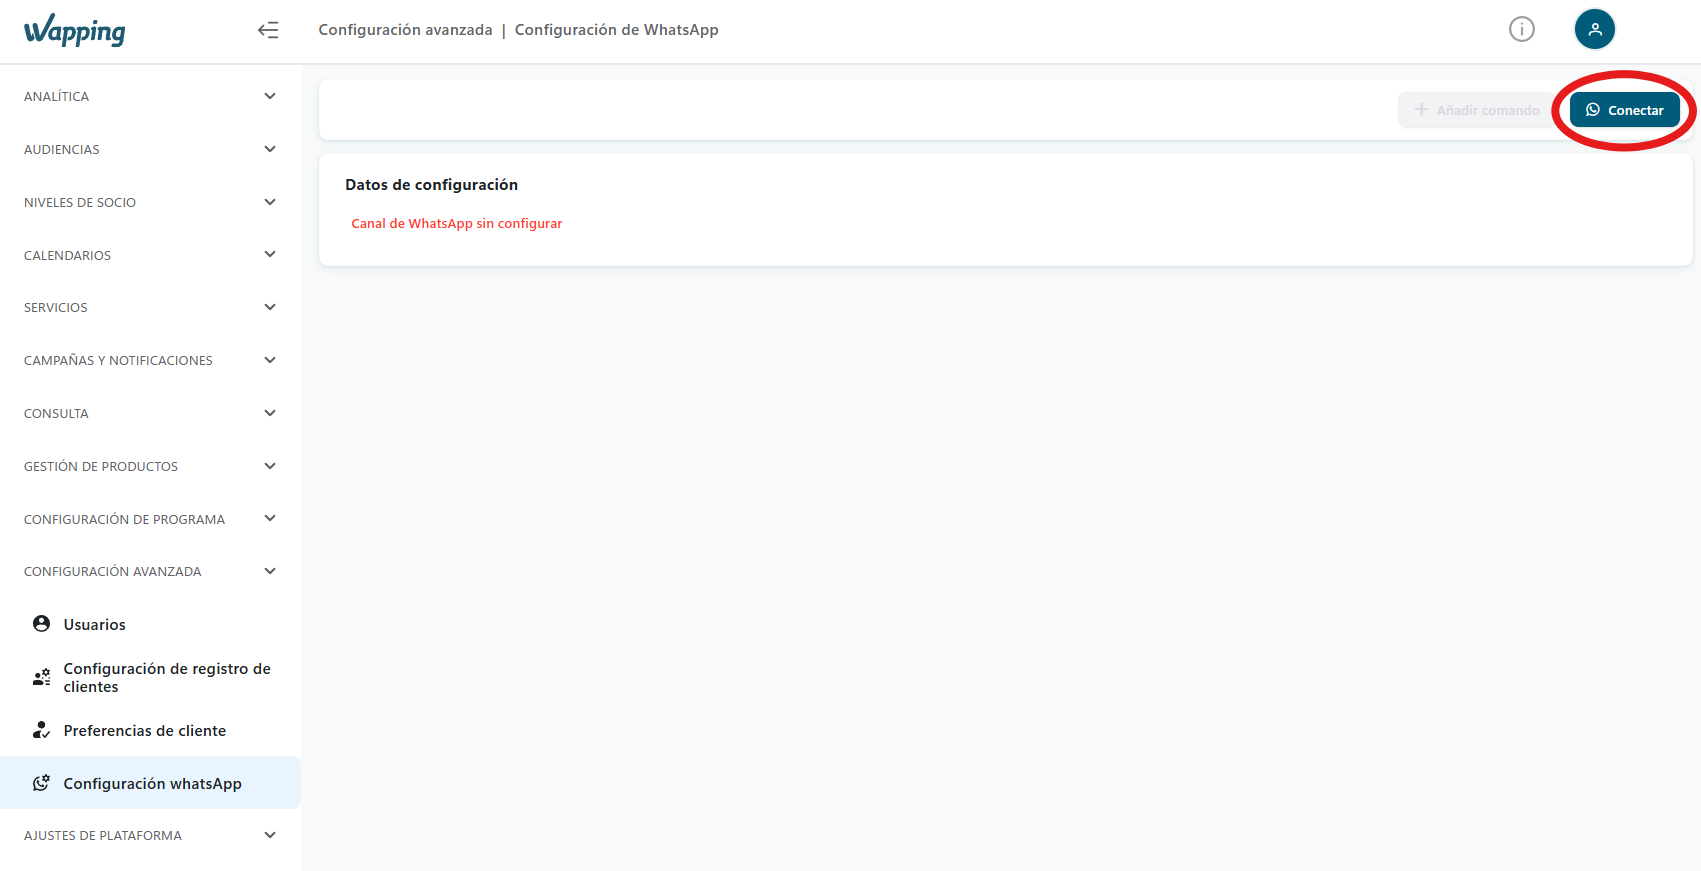
To link whatsapp account in Manager you can do it in the Connect button and following the assistant.
Validate number in meta business manager
After this in Meta business manager you will be able to validate the phone number.
Updated 17 days ago